
The best place to start when discussing ways to improve your cost model is establishing a definition of what is a cost model in the context of the EMS industry. A Dictionary definition of a cost model is that “a cost model is a mathematical algorithm or equation for estimating costs of a product or project.” To put it more plainly, a cost model turns things that your business does into an expression of cost.
For example, as a business, you might do purchasing, machine setup or soldering. Each of those activities can be tied to a cost. Purchasing could be $7 per line item, machine setup could be $45 for each new job, soldering could be 3 cents per solder joint.
While the cost model simply indicates the cost of something, it does not indicate the value of something. This is why there is an important distinction to be made between a cost model and a pricing strategy. For example, your cost of soldering a component could be $0.03 per solder joint, but for Customer A you could be charging them $0.05 cents and for customer B you could be charging them $0.07 cents. The price that you charge the customer can be based on a variety of factors such as their price sensitivity, industry, your past experiences working with them, etc. However, your true cost of applying solder to a joint would still be constant at $0.03 per solder joint.
While there is an obvious link between an accurate cost model and an effective pricing strategy, especially in a cost plus industry like Electronics Manufacturing Services (EMS), we are going to be focusing on a cost model and not pricing strategy.
7 Ways to Improve
Now, that we’ve established the meaning of a cost model, let’s get right into the seven ways to improve your cost model. This list of 7 came about from the most common things we’ve seen across the 100+ EMS companies we have worked with. Given that most of our customers are in the high-mix, low-volume EMS space, the list is focused on the needs of that segment.
1. MECE
The first way to improve your cost model is to double check for MECE, which means mutually exclusive, completely exhaustive. To understand what it means, let’s break it into its two parts and start with what it means to be mutually exclusive.
Mutually exclusive as it applies to cost modeling just means that there should not be an overlap between two items in your cost model. The reason behind this, once you think about it, becomes pretty obvious. If you create a labor model where you mark up material costs by 10% to account for the labor cost of purchasing and receiving, but also charge on a separate section for the labor hours required to do purchasing and receiving, then you will end up over estimating the cost of a job. That is an example of being mutually exclusive.
Completely exhaustive covers the other side of that. Completely exhaustive means that you want to make sure that all of the costs that your assembly incur are covered by the cost model. Here’s an example based on a common case we encounter when we’re working with a company to create a labor model.
Let’s say the company pays an employee $15 per hour. That employee works 40 hours per week. If a job was going to take 10 hours of the employees time, you would have $15 x 10 hours = $150. But in doing that calculation you’d be wrong! There are other costs that need to be considered that go into this employee’s time. While the bulk of an employee’s time might go into this job, other large portions that the company still pays for include administrative costs, daily breaks, and whatever else the employee still gets to count as “on the clock time.” Typically, this is not considered part of the 10 hour estimate given to the customer.
The principle of being completely exhaustive says that you need to consider all of those other factors as part of your cost model. You might be thinking – “I can’t charge my customer for my employee’s lunch break!” but that’s not true. Someone HAS to pay for that lunch break. If you are a profitable company and not applying a completely exhaustive cost model, then you’re either quoting a job assuming greater profit margin than you’re actually getting, or you’re counting that cost in some other bucket without realizing it.
It is important for you to consider MECE as part of your cost model creation for these examples as explained.
2. COST LEVELS
When considering costs, it helps to think of them as fitting into one of four levels. As you go down the pyramid, the frequency of when that cost is incurred goes up.
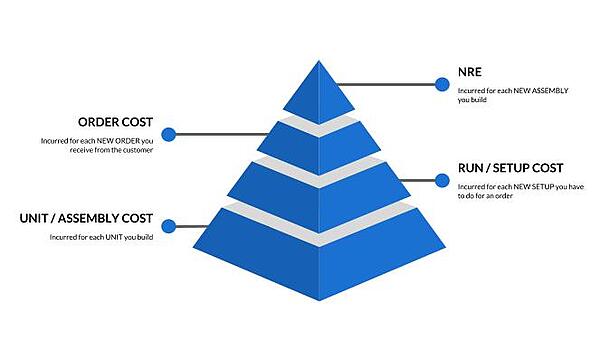
NRE: An NRE cost (non-recurring expense) is a cost that does not generally repeat itself for an assembly. It does not consider about how many times the customer places an order for an assembly, how many job setups you have, or the quantity that the order is for. The NRE charge is typically incurred just once for each NEW assembly you are going to build.
Order Cost: An order cost is a cost you incur each time a customer places an order. Consider the scenario of a customer issuing 10 purchasing orders for 5 pieces each or a customer placing one purchase order for 50 pieces but scheduled out in 10 deliveries. If it is 10 purchase orders received at different times, you’d have to validate that the order matches the quoted price 10 times, enter in 10 sales orders into your account system, and worst of all, go through that BOM and buy 5 pieces worth of materials 10 times. If it was just one purchase order with scheduled deliveries, you could review it once, enter in the sales order once and place the purchase order once, scheduled out over 10 shipments.
Run / Setup Cost: A run cost is the cost you incur for each setup that you have to do. The highest impact examples of this are kitting and machine setup. Often times, we come across labor models that fail to take multiple setups into consideration and when you’re building in very small quantities and have to do multiple setups which can get very expensive!
Unit / Assembly Cost: The unit or assembly cost is what you incur for each unit you are building. The most obvious example in this category is material cost. The more units you are building, even if the per unit material cost goes down because of price breaks, your total material cost will increase.
3. BURDENED LABOR RATE
The third way to a better cost model is typically a bit controversial, especially for the finance individuals. Although the formal definition of a burdened labor rate keeps it limited to costs related to labor employment, a lot of EMS companies use a burdened labor rate as a catch all for anything that is not a material cost. While it is valuable and important to consider the costs that are added on top of your hourly labor rate, there are some drawbacks to this approach.
We typically see that burdened labor rates are not updated when burdens change; if it doesn’t apply to your company, consider yourself lucky. They are usually calculated on a set annual schedule. The problem with this is that costs do not wait for the start of the next year to show up on your income statement. Therefore, your burdened labor rate could be over or under burdened as your costs adjust throughout the year.
This ties into the second point, which is that usually a burdened labor rate is calculated in an over engineered excel spreadsheet on an individuals computer. It isn’t transparent and it isn’t easy to go make updates. For example, if in the middle of your fiscal year, your rent increases by 10%, would it be simple for you to go update the burdened labor rates in your labor model? For most people, it wouldn’t.
Finally, if you’re trying to allocate overhead costs that are not correlated to labor hours at all, then you could be misallocating your overhead. Consider sales and marketing expense as an example. Sales and marketing costs are rarely dependent on the amount of labor hours a job requires. More likely, they are dependent on the revenue being generated which would mean it wouldn’t make sense to incorporate your trade show expenses, website development, and sales commission into your hourly rate.
So how should the burdened labor rate be broken apart? We recommend actually having your overhead costs and allocation mechanisms as a part of your cost model using activity based costing.
Here’s an example:
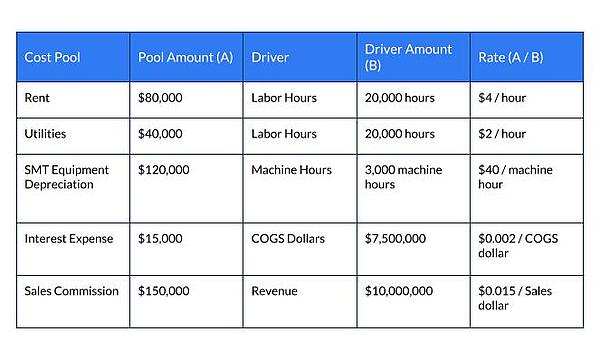
Start by listing out all of your cost pools and their costs. This is everything that you wouldn’t consider as a material cost when pricing your BOM and everything not covered by your labor model. That’s an important thing to remember going back to our talk about MECE. Be careful not to double count your overhead in other parts of your cost model.
Once you’ve listed your cost pools and corresponding costs, assign a driver to them. What causes that cost to be incurred? It might be a function of labor hours, or it might be something else. Whatever that thing is, you should list it.
Then find out what is your rate and multiply it by the amount of activity that is incurred. If you’re interested, you can reach to our team at info@calcuquote.com to learn more about this.
4. SETUP AND RUN SCRAP
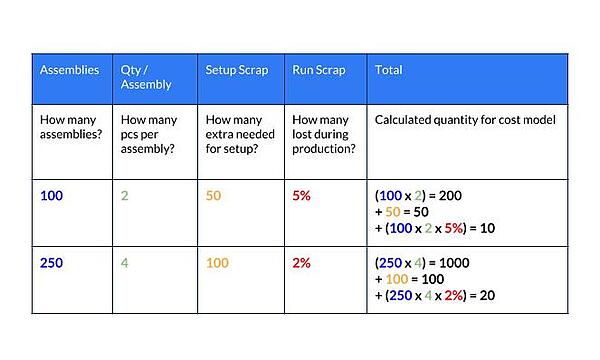
This one falls under the umbrella of completely exhaustive cost models. Often times we see companies that fail to consider overages during their quoting process. Here’s what is meant by setup and run scrap. Consider for a minute that you’re preparing a cost model for building 100 assemblies. There’s an 0402 resistor on the BOM with two reference designators which turns into 200 resistors in your cost model. When you win the business, you consider that because this is only 200 pieces and will come in a cut tape, you need to buy a few extra inches for your SMT machine. You allow for 50 extra resistors and 10 more extra for the risk of a line shortage due to a machine issue. Altogether, you end up purchasing 260 resistors instead of the 200 that you quotedwhich causes your cost to increase by 30%.
This is why it is important to consider leader and attrition, also known as setup and run scrap, as part of your cost model.
This can be easy to set up. Just apply a formula as shown here.
5. ACTUAL MATERIAL COSTS
This next topic is also bit controversial. Every once in a while, we encounter a company that uses different pricing for their quoting than they do for their purchasing. This occurs when publicly, available pricing is use for the cost of a job when quoting and estimating. When the business is won, the job will be re-quoted using preferred, discounted pricing.
The logic goes that when you’re quoting, you use the generic web pricing and the delta between that and your actual procurement cost is margin for the business. There’s a couple drawbacks of this approach:
- By not using actual costs as part of your cost model, you are blurring the lines between cost model and pricing strategy. This could mean you end up with an unclear picture of what your actual costs are. Or if you are using your cost model to compare estimates to actuals, then you’d end up with an artificially inflated positive variance.
- When an EMS company uses the standard web pricing for costing the bill of material, and then when they are deciding how much to mark up the job, they treat the estimated material cost as the cost basis. If you’re adding a percentage markup on top of your material costs, now you’ve compounded the artificially inflated material cost with an additional markup cost.
6. CHECK EXCEL FORMULAS
When we are onboarding customers from their excel based labor cost models to CalcuQuote’s labor module, we often start by combing through their spreadsheet to untangle the formulas and understand how CalcuQuote should be configured. Of the 100+ companies we have worked with, we have only ever found ONE excel spreadsheet that did not have a formula error in it. Often time, when we talk to users about errors we find in spreadsheets, we hear that the spreadsheet was created by so and so a few years ago, or it has gone through so many iterations that this could have just been a mistake from one of the changes.
If it’s been a while since you’ve looked at your excel labor model, or your labor model is overly complex, think about creating some simplicity. Use clear layouts and hire an Excel expert. Despite what a lot of excel whizzes think, the signs of a good excel file isn’t that it is complex. An excel file should be easy to understand and easy to update.
Even if you don’t want to use CalcuQuote for your labor cost model, reach out to our team to see an example of an Excel labor template.
7. UPDATE YOUR OPERATIONS
Sometimes, when we are working with companies to build their labor cost model, we’ll organize a workshop to go over the assumptions in their cost model. And the conversation, usually between sales and operations, will go something like this:
- SALES: How much time does it typically take to kit a job?
- ESTIMATOR: It takes about 3 minutes per line item.
- SALES: 3 minutes? No way anyone is going to pay for such a large amount of time! I think we should put 1 minute in our model.
- ESTIMATOR: Then why did you ask?!
In this example, while it is entirely possible that no one would be willing to pay the 3 minutes per line item, the answer isn’t to lie on your cost model. Assuming that the ACTUAL time is 3 minutes, here are two options:
- Keep the 3 minutes in your cost model and then when making a decision about mark ups, consider how competitive you need to be on a job. If needed, lower your markup and allow for less margins knowing that your kitting cost is higher than where it needs to be at this time.
- Figure out what is actually going on with that process that it is taking 3 minutes. Maybe there are process improvements you can make to add efficiencies. And then apply those updates to your cost model. For example, when evaluating the kitting process, you might determine that the reason for such a high time during kitting is that the stockroom employee can only pick one part at a time. Why? Because the cart that they use broke a few months ago and no one has gotten around to repairing it. So you give them a cart so that they can go up and down the aisles without having to walk back to the work station. Now your kitting process takes 2 minutes per line item instead of 3 and your cost model needs to be updated.
Let’s take another example: you’ve decided that to really add efficiency to your kitting process, you need to barcode your inventory upon receiving and invest $50,000 in new barcode scanners. This will reduce your kitting time so that it only takes 30 seconds per line item. That’s a big improvement! But, you also need to consider that applying your own labels to each part will result in a cost for labels, ink, and potentially increase the time it takes to receive inventory. Also, in your overhead allocation, you need to consider depreciation for the $50k in barcode equipment over its lifespan.